# ADFS SAML

{% hint style="success" %}
对应的[官方文档地址](https://bitwarden.com/help/article/saml-adfs/)
{% endhint %}

本文是**专门针对 Active Directory Federation Services (AD FS)** 用于配置 SAML 2.0 方式的 SSO 登录的帮助。有关其他 IdP 方式配置 SSO 登录的帮助，请参阅 [SAML 2.0 配置](/docs/admin-console/login-with-sso/sso-guides/generic-saml.md)。

配置需要在 Bitwarden 网页 App 和 AD FS 服务器管理器中同时进行。操作过程中，我们建议同时打开这两个界面，并按照文档记录的步骤顺序完成操作。

{% hint style="success" %}
**已经是 SSO 专家了吗？**&#x8DF3;过本文中的说明，然后下载示例配置，将里面的屏幕截图与您自己的配置进行比较。

**⬇️** [下载示例](https://bitwarden.com/assets/5892IOGrU7B9lvBmN0P0xl/5719d49a8f15bcf9f6371fbd28827f17/saml-adfs-sample.zip)
{% endhint %}

## 在网页 App 中打开 SSO <a href="#open-sso-in-the-web-app" id="open-sso-in-the-web-app"></a>

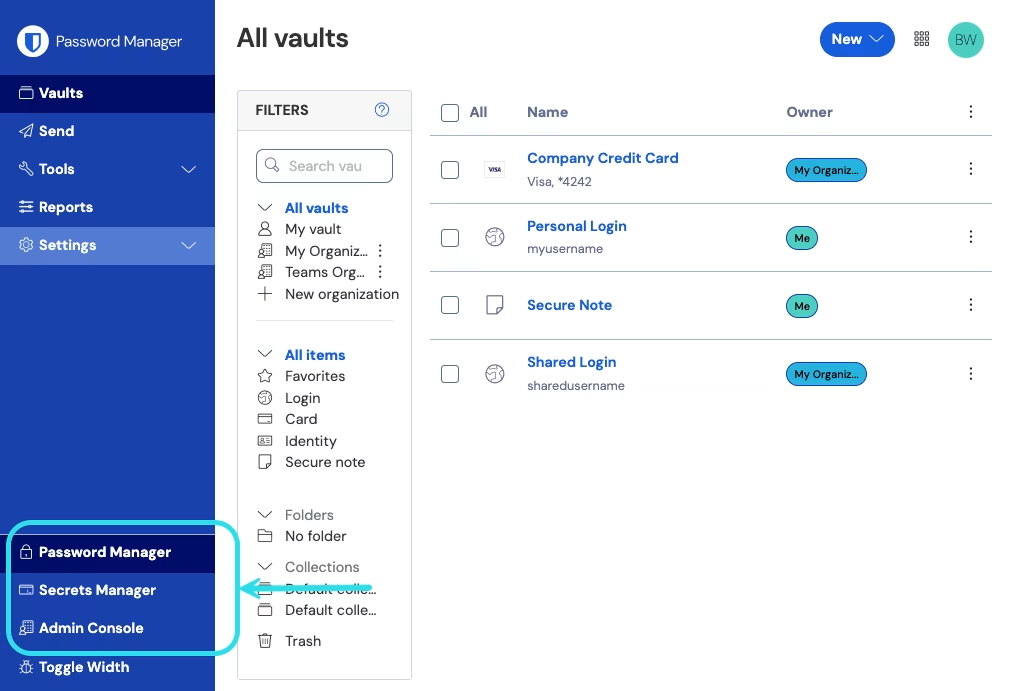
登录到 Bitwarden [网页 App](https://bitwarden.com/help/getting-started-webvault/)，然后使用产品切换器打开管理控制台：

<div align="left" data-with-frame="true"><figure><img src="https://bitwarden.com/assets/2uxBDdQa6lu0IgIEfcwMPP/e3de3361749b6496155e25edcfdcf08b/2024-12-02_11-19-56.png?w=1013&#x26;fm=avif" alt=""><figcaption><p>产品切换器</p></figcaption></figure></div>

打开组织的**设置** → **单点登录**界面：

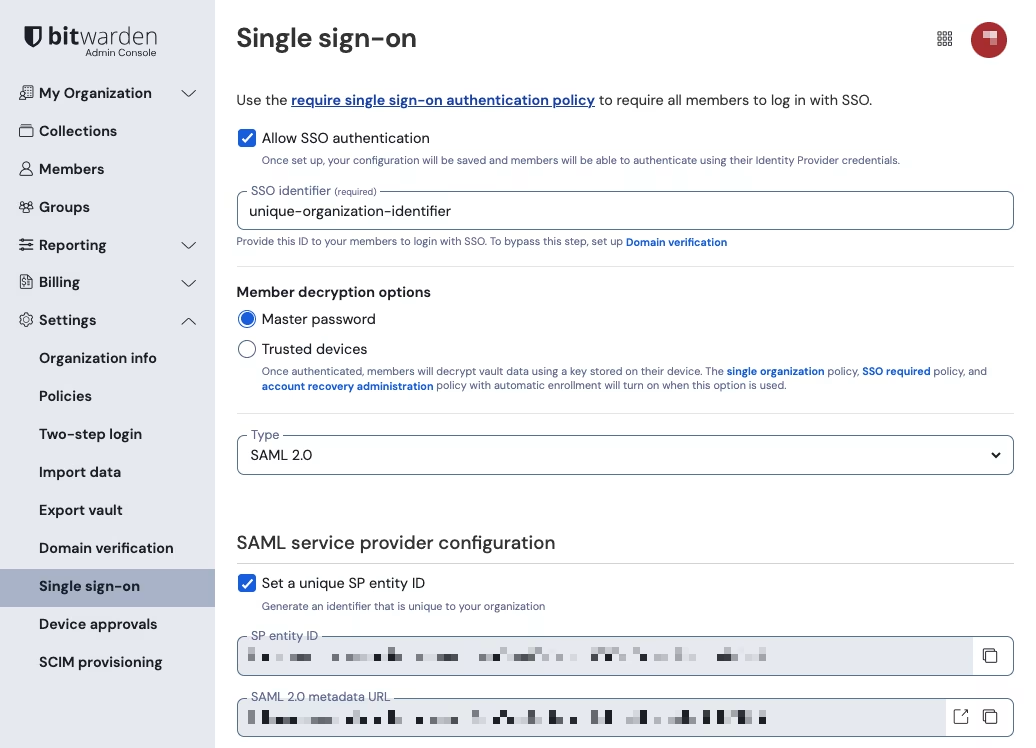
<div align="left" data-with-frame="true"><figure><img src="https://bitwarden.com/assets/20720mRAluo6crSdTiYJrn/1175889d7f6ab42fe7614f34cdd1dcdd/2024-12-04_09-41-15.png?w=1036&#x26;fm=avif" alt=""><figcaption><p>SAML 2.0 配置</p></figcaption></figure></div>

如果还没有为您的组织创建唯一的 **SSO 标识符**，请创建一个，然后从**类型**下拉菜单中选择 **SAML**。保持此界面打开，以方便参考。

如果愿意，您可以在此阶段关闭**设置唯一的 SP 实体 ID** 选项。这样做会从 SP 实体 ID 值中移除组织 ID，但大多数情况下都建议打开该选项。

{% hint style="success" %}
还可以选择使用**成员解密选项**。了解如何开始使用[受信任设备 SSO](/docs/admin-console/login-with-sso/trusted-devices/about-trusted-devices.md) 或 [Key Connector](/docs/self-hosting/key-connector/about-key-connector.md)。
{% endhint %}

## 创建依赖方信任 <a href="#create-a-relying-party-trust" id="create-a-relying-party-trust"></a>

在 AD FS 服务器管理器中，选择 **Tools** → **AD FS Management** → **Action** → **Add Relying Party Trust**。在向导中，进行如下的选择：

1、在 Welcome（欢迎）界面，选择 **Claims Aware**。

2、在 Select Data Source（选择数据来源）界面，选择 **Enter data about the relying party manually**。

3、在 Specify Display Name（指定显示名称）界面，输入一个专用于 Bitwarden 的显示名称。

4、在 Configure URL（配置 URL）界面，选择 **Enable support for SAML 2.0 WebSSO protocol**。

* 在 **Relying party SAML 2.0 SSO service URL** 输入框中，输入从 Bitwarden SSO 配置界面获取到的断言消费者服务（ACS）URL。这个自动生成的值可以从组织的**设置** → **单点登录**界面中复制，并根据您的设置而有所不同。。

5、在 **Choose Access Control Policy** 界面，选择符合安全标准的策略。

6、在 **Configure Identifiers** 界面，添加 SP 实体 ID 作为依赖方信任标识符。这个自动生成的值可以从组织的**设置** → **单点登录**界面中复制，并根据您的设置而有所不同。

7、在 **Choose Access Control Policy** 界面，选择所需的策略（默认为 **Permit Everyone**）。

8、在 **Ready to Add Trust** 界面，查看您的选择。

### 高级选项 <a href="#advanced-options" id="advanced-options"></a>

创建依赖方信任后，您可以通过从左侧文件导航器中选择 **Relying Party Trusts** 并选择正确的显示名称来进一步配置其设置。

#### 哈希算法 <a href="#hash-algorithm" id="hash-algorithm"></a>

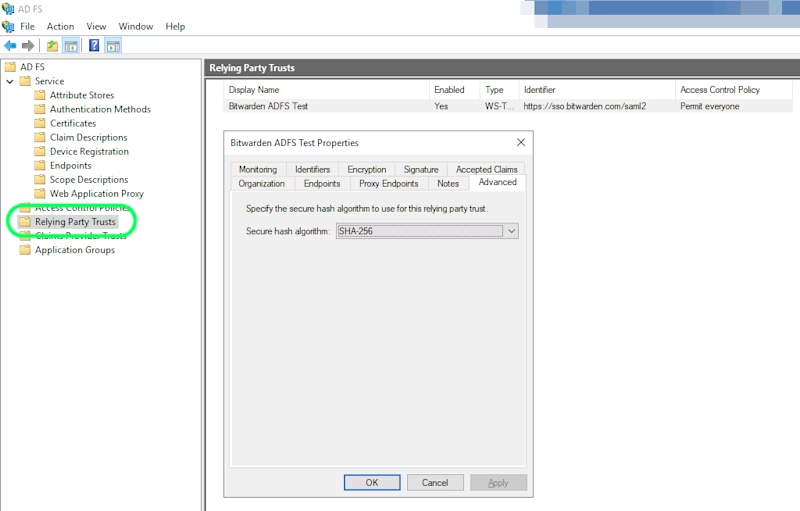
要更改 **Secure hash algorithm**（默认为 SHA-256），请导航到 **Advanced** 选项卡：

<div align="left" data-with-frame="true"><figure><img src="https://bitwarden.com/assets/55udgWPsUtxhl465HMFGV7/2d0dcb14562599aca669d60d00cf8b5a/saml-adfs3.png?w=800&#x26;fm=avif" alt=""><figcaption><p>设置一个安全的哈希算法</p></figcaption></figure></div>

#### 端点绑定 <a href="#endpoint-binding" id="endpoint-binding"></a>

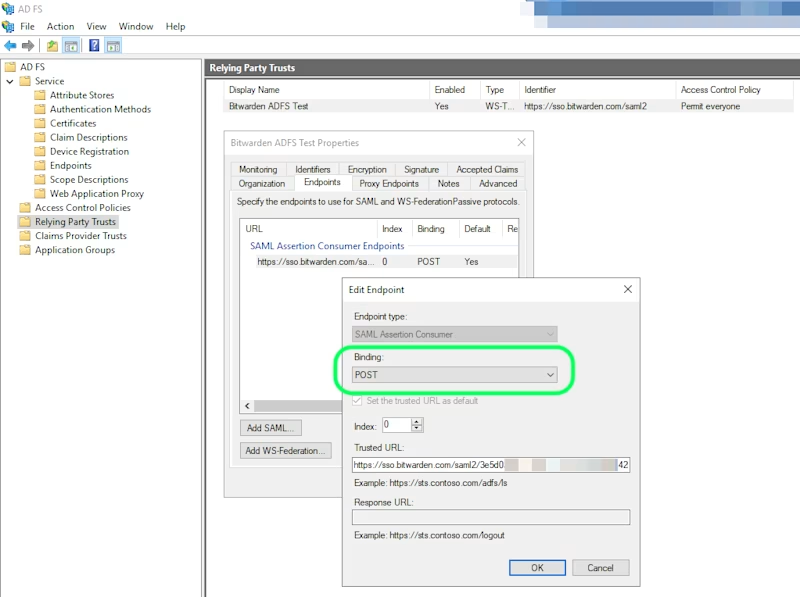
要更改端点 **Binding**（默认为 POST），请导航到 **Endpoints** 选项卡然后选择已配置的 ACS URL：

<div align="left" data-with-frame="true"><figure><img src="https://bitwarden.com/assets/N2pjHd1LxGhH0h0620BfV/c1280e20044b6f36758c56ea22d6935f/saml-adfs4.png?w=800&#x26;fm=avif" alt=""><figcaption><p>编辑端点</p></figcaption></figure></div>

### 编辑声明颁发规则 <a href="#edit-claim-issuance-rules" id="edit-claim-issuance-rules"></a>

构建声明颁发规则以确保将适当的声明（包括 **Name ID**）传递给 Bitwarden。要编辑声明颁发规则，请返回上一界面，导航至 Edit Claim Issuance Policy，然后从右侧导航中选择它。

以下选项卡演示了示例规则集：

{% tabs %}
{% tab title="规则 1" %}
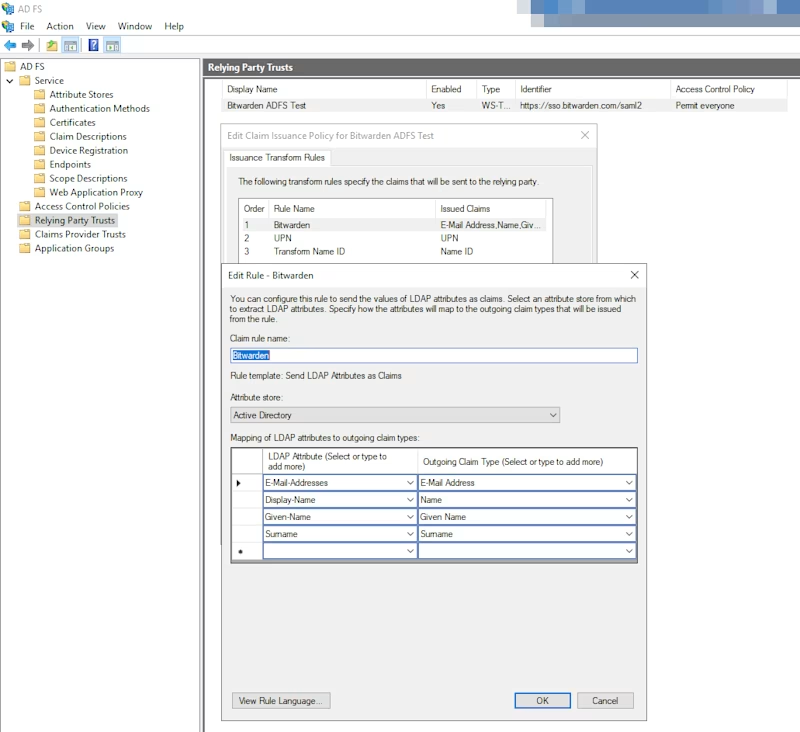
规则 1 使用声明规则模板 **Send LDAP Attributes as Claims**。

<div align="left" data-with-frame="true"><figure><img src="https://bitwarden.com/assets/4AVKGRDotEE4DmHnYUQ7dH/78a16406fa80d28b0b3b3db8ffb54d8c/saml-adfs5.png?w=800&#x26;fm=avif" alt=""><figcaption><p>ADFS 规则 1</p></figcaption></figure></div>
{% endtab %}

{% tab title="规则 2" %}
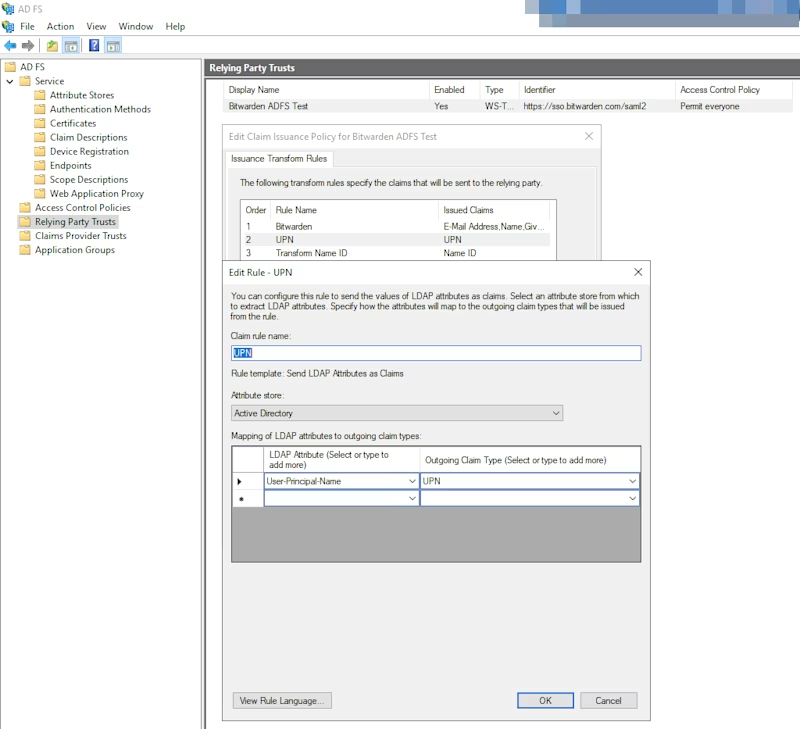
规则 2 使用声明规则模板 **Send LDAP Attributes as Claims**。

<div align="left" data-with-frame="true"><figure><img src="https://bitwarden.com/assets/6B5hyOKQYJwLYOy0NdsXbW/1906a568bf8e59cdb9c5122c0a1a0c48/saml-adfs6.png?w=800&#x26;fm=avif" alt=""><figcaption><p>ADFS 规则 2</p></figcaption></figure></div>
{% endtab %}

{% tab title="规则 3" %}
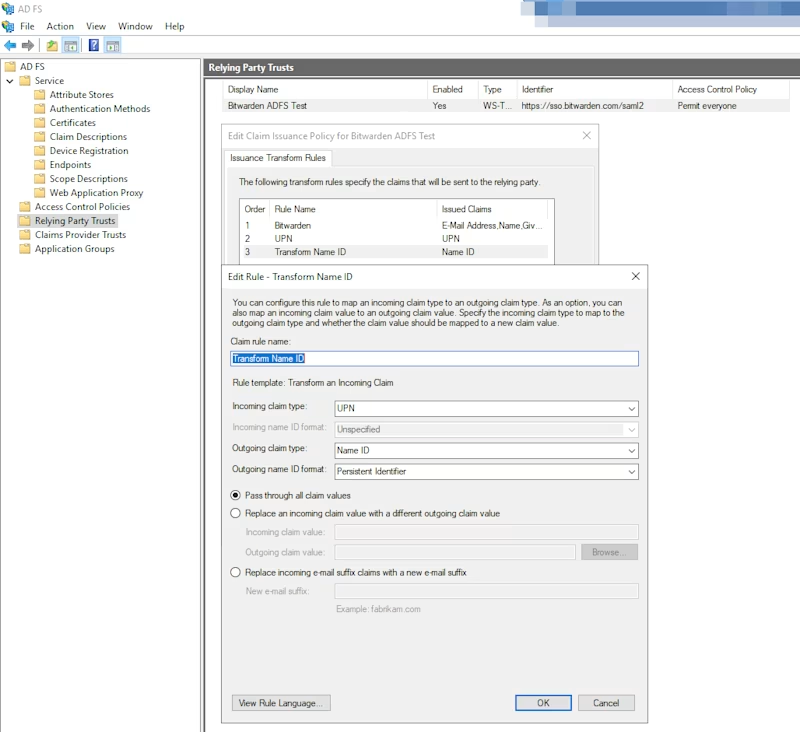
规则 3 使用声明规则模板 **Transform an Incoming Claim**。

<div align="left" data-with-frame="true"><figure><img src="https://bitwarden.com/assets/5MXoJkIzw0EUgj4ImrctYK/fa8d5bd0d3e11d6a40f7ce1b28667680/saml-adfs7.png?w=800&#x26;fm=avif" alt=""><figcaption><p>ADFS 规则 3</p></figcaption></figure></div>
{% endtab %}
{% endtabs %}

### 获取证书 <a href="#get-certificate" id="get-certificate"></a>

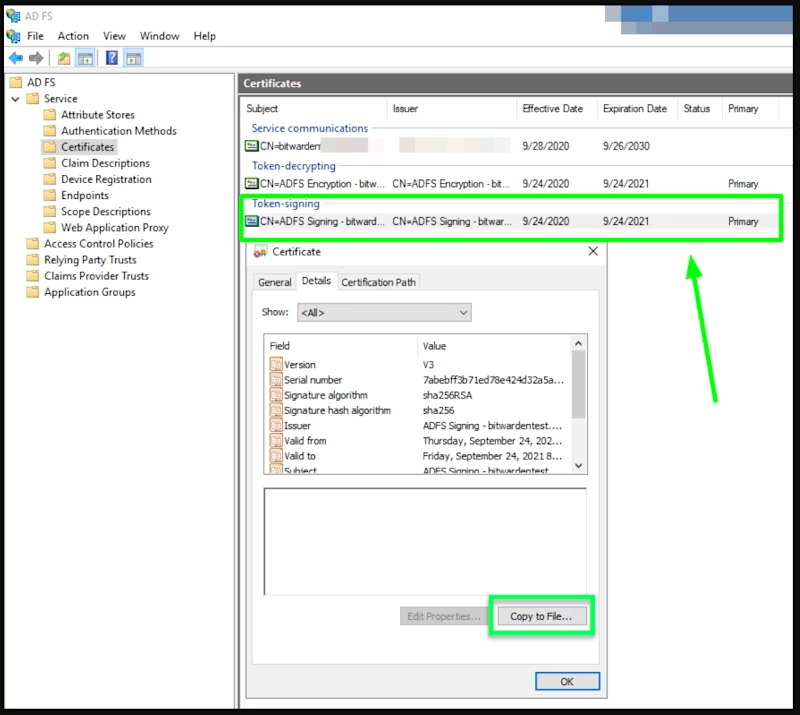
在左侧的文件导航器中，选择 **AD FS** → **Service** → **Certificates**，打开证书列表。选择 **Token-signing** 证书，导航到其 **Details** 选项卡，然后选择 **Copy to File…** 按钮以导出 Base-64 编码的令牌签名证书：

<div align="left" data-with-frame="true"><figure><img src="https://bitwarden.com/assets/7lfIJtH8gWTtOlyGucLa7o/fd30e57b1aef292139049f7e4ab27038/saml-adfs8.png?w=800&#x26;fm=avif" alt=""><figcaption><p>获取令牌签名证书</p></figcaption></figure></div>

在[后面的步骤中](/docs/admin-console/login-with-sso/sso-guides/adfs-saml.md#identity-provider-configuration)您将需要此证书。

### 获取联合服务标识符 <a href="#get-federation-service-identifier" id="get-federation-service-identifier"></a>

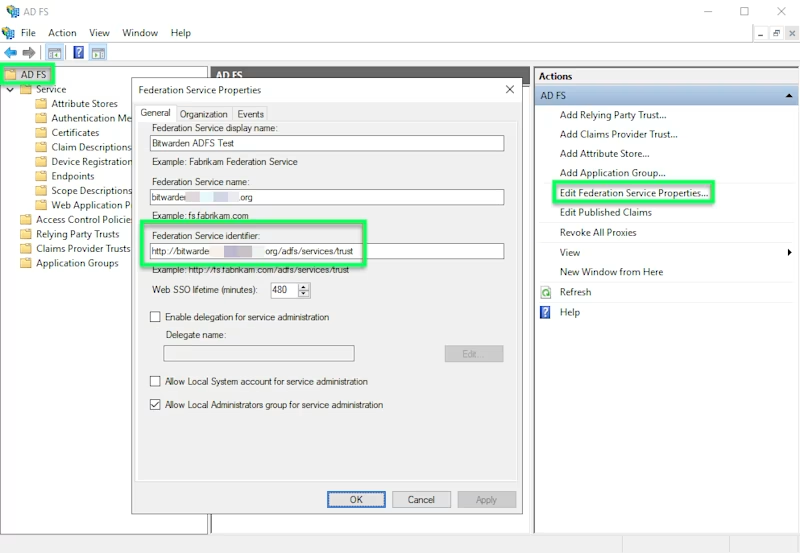
在左侧的文件导航器中，选择 **AD FS**，然后从右侧的选项菜单中选择 **Edit Federation Service Properties**。在 Federation Service Properties（联合服务属性）窗口中，复制 **Federation Service Identifier**：

<div align="left" data-with-frame="true"><figure><img src="https://bitwarden.com/assets/5pU9gOjjO9GwHDFocB3pia/007256b6b85837e6b8fab4f79d72681f/saml-adfs9.png?w=800&#x26;fm=avif" alt=""><figcaption><p>获取联合服务标识符</p></figcaption></figure></div>

在[后面的步骤中](/docs/admin-console/login-with-sso/sso-guides/adfs-saml.md#identity-provider-configuration)您将需要此标识符。

## 返回网页 App <a href="#back-to-the-web-app" id="back-to-the-web-app"></a>

至此，您已经在 AD FS 服务器管理器范围内配置好了您所需要的一切。请返回 Bitwarden 网页 App 完成配置。

单点登录界面将配置分为两个部分：

* &#x20;**SAML 服务提供程序配置**将决定 SAML 请求的格式。
* &#x20;**SAML 身份提供程序配置**将决定用于 SAML 响应的预期格式。

### 服务提供程序配置 <a href="#service-provider-configuration" id="service-provider-configuration"></a>

在服务提供程序配置部分，配置以下字段：

| 字段                                 | 描述                                                                                                                                                |
| ---------------------------------- | ------------------------------------------------------------------------------------------------------------------------------------------------- |
| Name ID Format                     | 选择构建[声明颁发规则](/docs/admin-console/login-with-sso/sso-guides/adfs-saml.md#edit-claim-issuance-rules)时选择的 **Outgoing Name ID Format**（请参阅**规则 3**）。  |
| Outbound Signing Algorithm         | Bitwarden 用来签署 SAML 请求的算法。                                                                                                                        |
| Signing Behavior                   | SAML 请求是否/何时将被签名。                                                                                                                                 |
| Minimum Incoming Signing Algorithm | 默认，AD FS 将使用 **SHA-256** 签名。从下拉列表中选择 SHA-256，除非您已[将 AD FS 配置为使用不同的算法](/docs/admin-console/login-with-sso/sso-guides/adfs-saml.md#hash-algorithm)。 |
| Want Assertions Signed             | Bitwarden 是否要求 SAML 断言被签名。                                                                                                                        |
| Validate Certificates              | 通过受信任的 CA 使用来自 IdP 的受信任和有效证书时，请选中此框。除非在 Bitwarden SSO 登录 docker 镜像中配置了适当的信任链，否则自签名证书可能会失败。                                                        |

完成服务提供程序配置部分后，**保存**您的工作。

### 身份提供程序配置 <a href="#identity-provider-configuration" id="identity-provider-configuration"></a>

身份提供程序配置通常需要您返回 AD FS 服务器管理器以获取相应的值：

| 字段                                  | 描述                                                                                                                                                                                                                   |
| ----------------------------------- | -------------------------------------------------------------------------------------------------------------------------------------------------------------------------------------------------------------------- |
| Entity ID                           | 输入获取到的 [Federation Service Identifier](/docs/admin-console/login-with-sso/sso-guides/adfs-saml.md#get-federation-service-identifier)（联合服务标识符）。请注意，这**可能不使用 HTTPS**。                                                  |
| Binding Type                        | 默认，AD FS 使用 HTTP POST 端点绑定。除非您已[将 AD FS 配置为使用不同的方法](/docs/admin-console/login-with-sso/sso-guides/adfs-saml.md#endpoint-binding)，否则请选择 **HTTP POST**。                                                                |
| Single Sign On Service URL          | 输入 SSO 服务端点。该值可以从 AD FS 管理器的 **Service** → **Endpoints** 选项卡中获取。端点 URL 被列为 **SAML2.0/WS-Federation 的 URL 路径**，通常类似于 `https://your-domain/adfs/ls`。您可以从 `FederationMetadata.xml` 文档中的 SingleSignOnService 的配置键获取准确的值。 |
| X509 Public Certificate             | <p>黏贴已下载的证书，移除 <code>-----BEGIN CERTIFICATE-----</code>  和 <code>-----END CERTIFICATE-----</code>。<br><br>证书值区分大小写，多余的空格、回车符和其他多余的字符<strong>将导致证书验证失败</strong>。</p>                                                  |
| Outbound Signing Algorithm          | 默认情况下，AD FS 将使用 SHA-256 签名。从下拉列表中选择 **SHA-256**，除非您已[将 AD FS 配置为使用不同的算法](/docs/admin-console/login-with-sso/sso-guides/adfs-saml.md#hash-algorithm)。                                                                 |
| Allow Outbound Logout Requests      | SSO 登录当前**不支持** SLO。该选项计划未来开发。                                                                                                                                                                                       |
| Want Authentication Requests Signed | AD FS 是否要求 SAML 请求被签名。                                                                                                                                                                                               |
{% hint style="info" %}
填写 X509 证书时，请注意到期日期。必须续签证书，以防止向 SSO 最终用户提供的服务中断。如果证书已过期，管理员和所有者账户将始终可以使用电子邮箱地址和主密码登录。
{% endhint %}

完成身份提供程序配置部分后，**保存**您的工作。

{% hint style="success" %}
您可以通过激活[单点登录身份验证策略](/docs/admin-console/oversight-visibility/enterprise-policies.md#require-single-sign-on-authentication)来要求用户使用 SSO 登录。
{% endhint %}

## 测试配置 <a href="#test-the-configuration" id="test-the-configuration"></a>

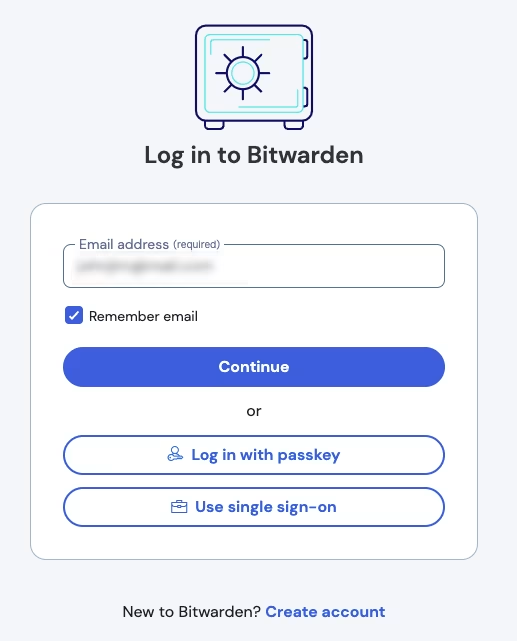
配置完成后，通过导航到 <https://vault.bitwarden.com> 或 [https://vault.bitwarden.eu](https://vault.bitwarden.eu/)，输入您的电子邮箱地址，然后选择**使用单点登录**按钮进行测试：

<div align="left" data-with-frame="true"><figure><img src="https://bitwarden.com/assets/3BdlHeogd42LEoG06qROyQ/c68021df4bf45d72e9d37b1fbf5a6040/login.png?w=517&#x26;fm=avif" alt=""><figcaption><p>登录选项界面</p></figcaption></figure></div>

输入[已配置的组织标识符](/docs/admin-console/login-with-sso/sso-guides/generic-saml.md#step-1-set-an-organization-identifier)，然后选择**登录**。如果您的实施已成功配置，您将被重定向到 AD FS SSO 的登录界面。使用您的 AD FS 凭据进行身份验证后，输入您的 Bitwarden 主密码以解密您的密码库！

{% hint style="info" %}
Bitwarden 不支持未经请求的响应，因此从您的 IdP 发起登录将导致错误。SSO 登录流程必须从 Bitwarden 发起。
{% endhint %}


---

# Agent Instructions: Querying This Documentation

If you need additional information that is not directly available in this page, you can query the documentation dynamically by asking a question.

Perform an HTTP GET request on the current page URL with the `ask` query parameter:

```
GET https://help.ppgg.in/docs/admin-console/login-with-sso/sso-guides/adfs-saml.md?ask=<question>
```

The question should be specific, self-contained, and written in natural language.
The response will contain a direct answer to the question and relevant excerpts and sources from the documentation.

Use this mechanism when the answer is not explicitly present in the current page, you need clarification or additional context, or you want to retrieve related documentation sections.