# Splunk SIEM

{% hint style="success" %}
对应的[官方文档地址](https://bitwarden.com/help/splunk-siem/)
{% endhint %}

Splunk Enterprise 是一个安全信息和事件管理 (SIEM) 平台，可与 Bitwarden 组织配合使用。组织可以使用 Splunk Enterprise 仪表板上的 [Bitwarden Event Logs](https://splunkbase.splunk.com/app/6592) App 来监控[事件](/docs/admin-console/oversight-visibility/event-logging/event-logs.md)活动。

## 设置 <a href="#setup" id="setup"></a>

### 创建 Splunk 账户 <a href="#create-a-splunk-account" id="create-a-splunk-account"></a>

在 Splunk 上安装 Bitwarden App 需要一个 Splunk Enterprise 账户。Bitwarden 事件监控支持以下 Splunk 平台：

* Splunk Enterprise
* Spunk Cloud Classic
* Splunk Cloud Victoria

### 安装 Splunk <a href="#install-splunk" id="install-splunk"></a>

对于本地部署的 Splunk 用户，下一步是安装 Splunk Enterprise。请按照 [Splunk 文档](https://help.splunk.com/en/splunk-enterprise/get-started/search-tutorial/9.0/part-1-getting-started/install-splunk-enterprise)完成 Splunk Enterprise 软件的安装。

{% hint style="info" %}
Bitwarden 支持 Splunk Enterprise 9.3、9.4 和 10.0 版本。Splunk Enterprise 8.X 版本已不再受支持。
{% endhint %}

### 创建索引 <a href="#create-an-index" id="create-an-index"></a>

在将您的 Bitwarden 组织连接到 Splunk 仪表板之前，需要先创建索引来维护 Bitwarden 数据。

1、打开位于顶部导航栏上的 **Settings** 菜单，然后选择 **Indexes**。

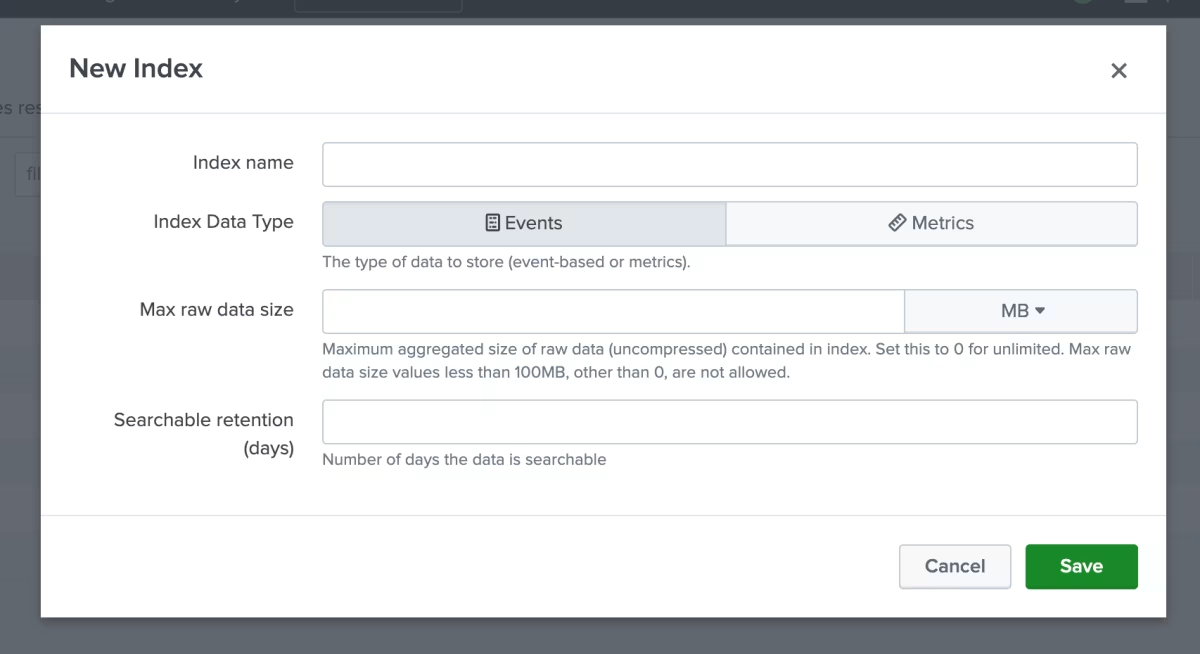
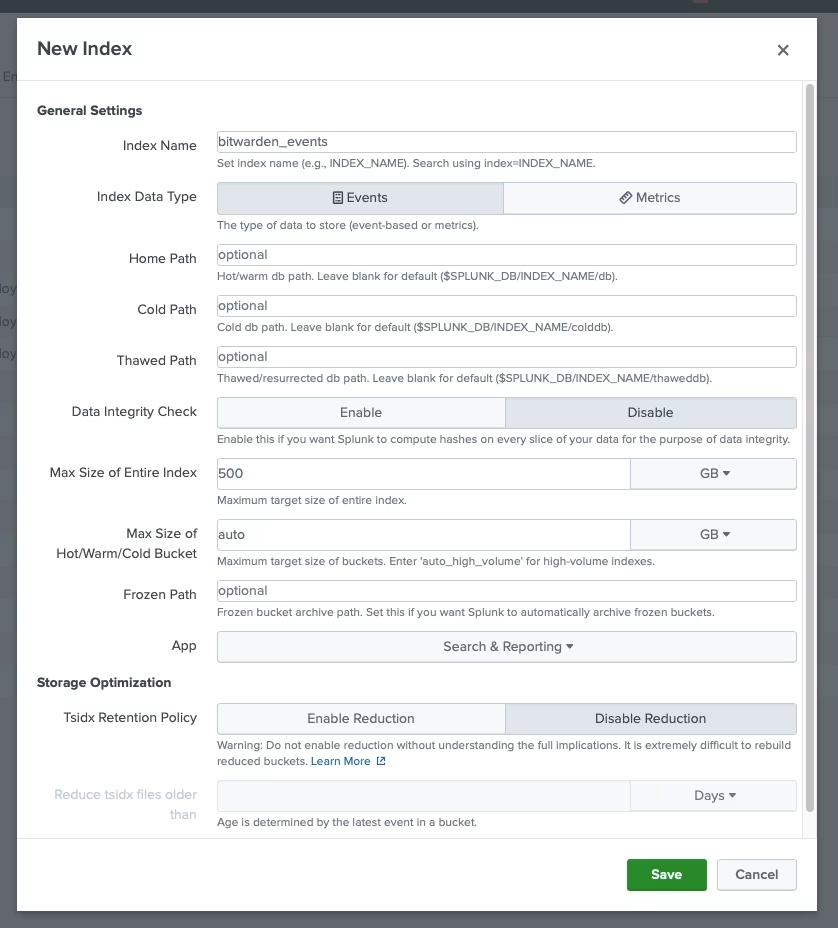
2、进入索引界面后，选择 **New Index**。将出现一个供您为 Bitwarden App 创建新索引的窗口。

{% tabs %}
{% tab title="Splunk Cloud" %}

<div align="left" data-with-frame="true"><figure><img src="https://bitwarden.com/assets/j3k8D4EBEEFPv7le82mFS/7cae447085492faf80f61898b7c4f0cf/new_index.png?w=1200&#x26;fm=avif" alt=""><figcaption><p>新增索引</p></figcaption></figure></div>
{% endtab %}

{% tab title="Splunk Enterprise" %}

<div align="left" data-with-frame="true"><figure><img src="https://bitwarden.com/assets/3yYEP61PqzSEl9tOBuwWIl/c452955bbba510d972d1584c5416fe13/new_index_sh.png?w=838&#x26;fm=avif" alt=""><figcaption><p>新增 Enterprise 索引</p></figcaption></figure></div>
{% endtab %}
{% endtabs %}

3、在 **Index Name** 字段中，输入 `bitwarden_events`。

4、为 **Max raw data size** 和 **Searchable retention** 应用您所需的值。

5、完成后，选择 **Save**。

### 安装 Splunk Bitwarden App <a href="#install-the-splunk-bitwarden-app" id="install-the-splunk-bitwarden-app"></a>

创建 Bitwarden 索引后，导航到 Splunk 仪表板。

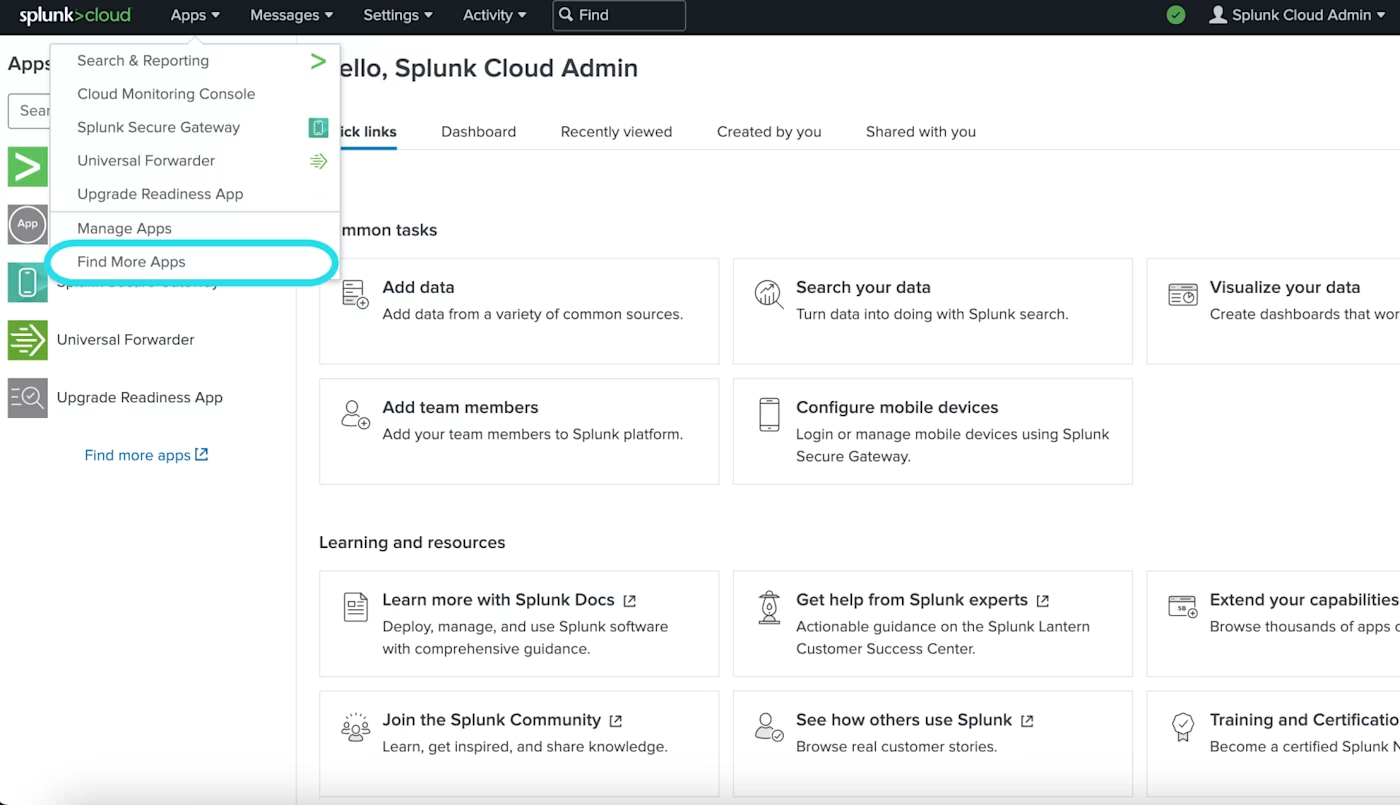
1、打开 **Apps** 下拉菜单，然后选择 **Find More Apps**。

<div align="left" data-with-frame="true"><figure><img src="https://bitwarden.com/assets/IsbH3oo9FYomh0InDjVwt/fc2aca538dedd4d56820e8da236d8278/more_apps.png?w=1400&#x26;fm=avif" alt=""><figcaption><p>Splunk App 仪表板</p></figcaption></figure></div>

2、选择 **Browse more apps**。

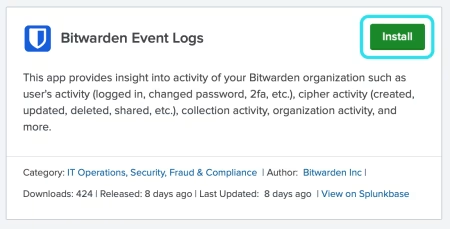
3、在 App 目录中搜索 **Bitwarden Event Logs**。为 **Bitwarden Event Logs** App 选择 **Install**。

<div align="left" data-with-frame="true"><figure><img src="https://bitwarden.com/assets/5IzRtDgpykBPZ21AUJnxbJ/c70ffa253781789cbeb200932edc0554/Bitwarden_event_logs.png?w=450&#x26;fm=avif" alt=""><figcaption><p><strong>Bitwarden Event Logs</strong> App</p></figcaption></figure></div>

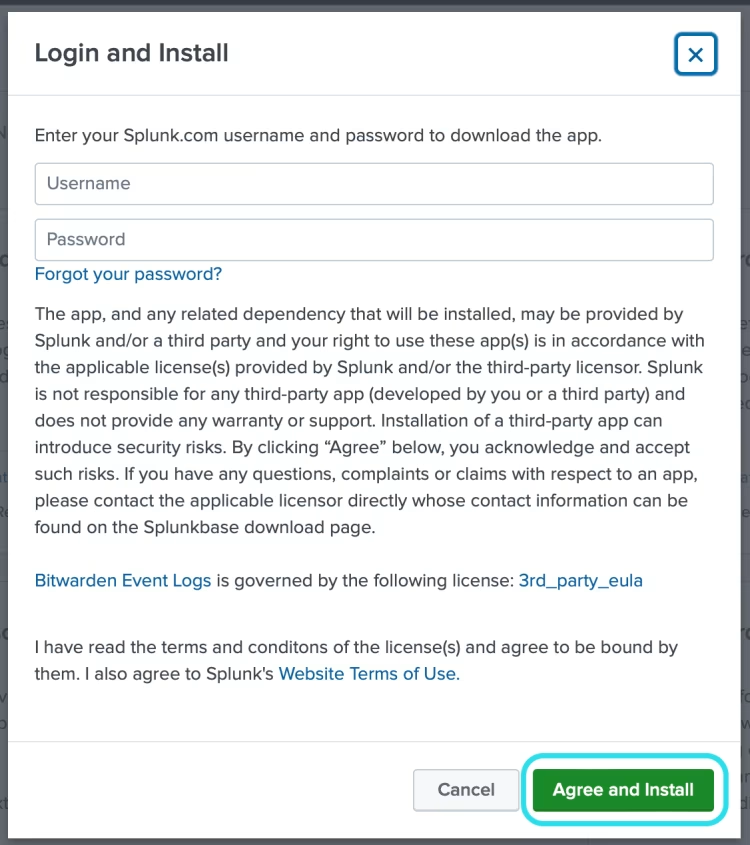
4、为了完成安装，您需要输入您的 [Splunk](https://splunkbase.splunk.com/) 账户。您的 Splunk 账户可能与用于访问 Splunk 门户的凭据不同。

<div align="left" data-with-frame="true"><figure><img src="https://bitwarden.com/assets/1Ko0eUuBz2AYIo0kNuxDoQ/2bb4b832236780509e6667e3c325a72f/2024-04-16_11-04-51.png?w=750&#x26;fm=avif" alt=""><figcaption><p>在 Splunk 上登录并安装 Bitwarden App</p></figcaption></figure></div>

5、输入信息后，选择 **Agree and Install**。

{% hint style="info" %}
下载 Bitwarden 事件日志 App 后，您可能需要重新启动 Splunk。
{% endhint %}

### 连接您的 Bitwarden 组织 <a href="#connect-your-bitwarden-organization" id="connect-your-bitwarden-organization"></a>

在您的 Splunk Enterprise 实例中安装 Bitwarden 事件日志 App 后，您即可使用您的 Bitwarden [API 密钥](/docs/admin-console/bitwarden-public-api.md#authentication)连接您的 Bitwarden 组织。

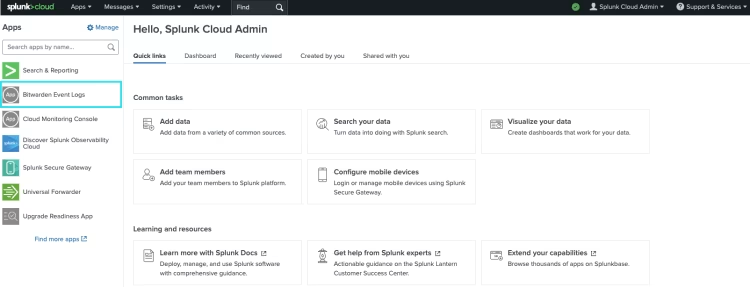
1、转到仪表板主页，然后选择 **Bitwarden Event Logs** App：

<div align="left" data-with-frame="true"><figure><img src="https://bitwarden.com/assets/4XFuwwljpBglow8GsaYTcP/08af521d324c76fea00937617a7fe19d/2024-05-06_16-09-59.png?w=750&#x26;fm=avif" alt=""><figcaption><p>Splunk 仪表板上的 Bitwarden</p></figcaption></figure></div>

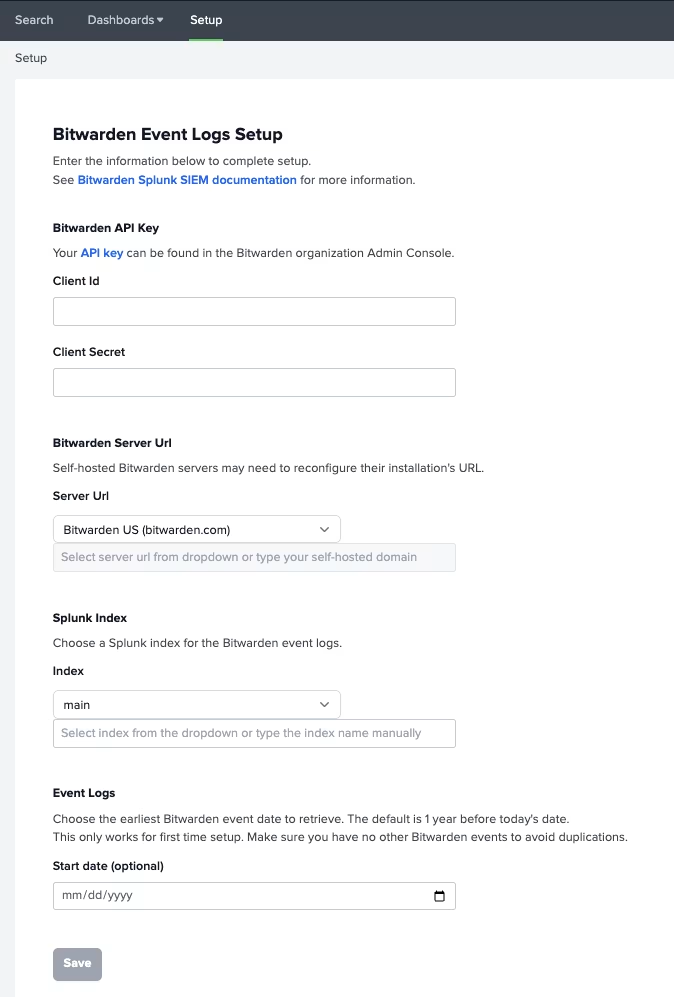
2、接下来，在 App 配置页面上，选择 **Continue to app setup page**。您可以在此处添加您的 Bitwarden 组织信息。

<div align="left" data-with-frame="true"><figure><img src="https://bitwarden.com/assets/4c0008B7jTVp0PQtp97p0h/e725995706475b44b8726db6fbf066c1/SplunkSetupFull_edited.png?w=674&#x26;fm=avif" alt=""><figcaption><p>设置 Bitwarden 菜单</p></figcaption></figure></div>

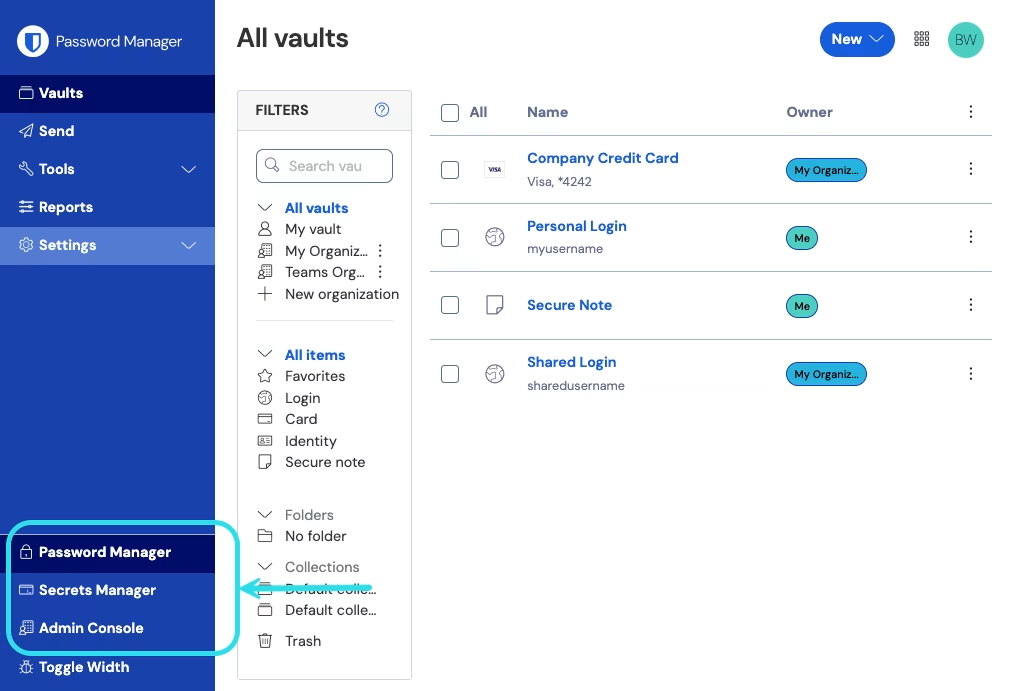
3、保持此界面打开，在另一个标签页上，登录 Bitwarden 网页 App，然后使用产品切换器打开管理控制台：

<div align="left" data-with-frame="true"><figure><img src="https://bitwarden.com/assets/2uxBDdQa6lu0IgIEfcwMPP/e3de3361749b6496155e25edcfdcf08b/2024-12-02_11-19-56.png?w=1013&#x26;fm=avif" alt=""><figcaption><p>产品切换器</p></figcaption></figure></div>

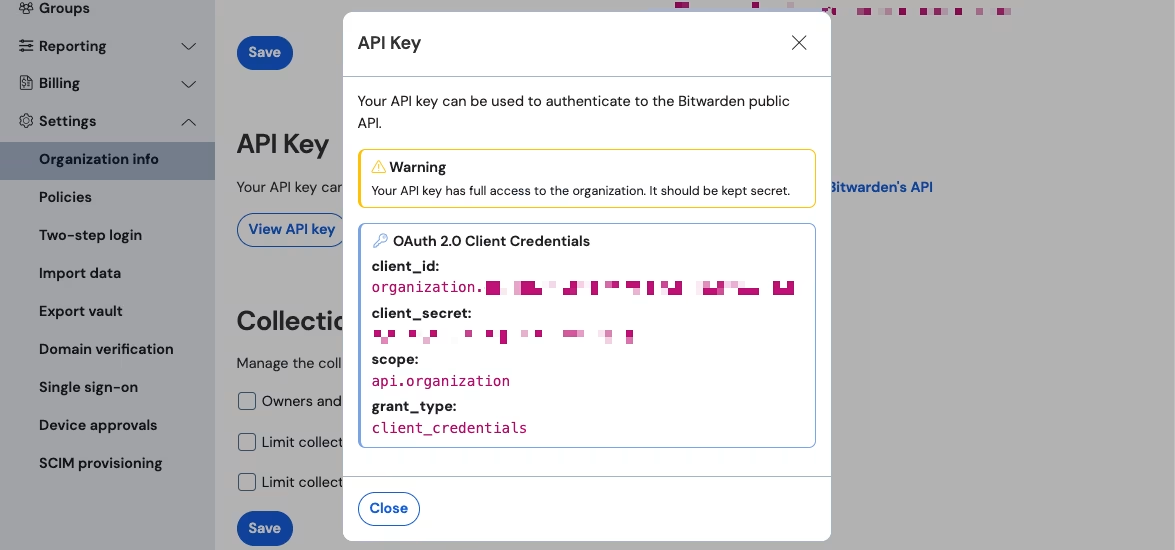
4、导航至您的组织的**设置** → **组织信息**，然后选择**查看 API 密钥**。将要求您重新输入主密码，以访问您的 API 密钥信息。

<div align="left" data-with-frame="true"><figure><img src="https://bitwarden.com/assets/6gHjAyqgeqDj6UPT6agsBK/3a614e043cb3836a41bd68f226835e53/2024-12-04_09-51-07.png?w=1175&#x26;fm=avif" alt=""><figcaption><p>组织 API 信息</p></figcaption></figure></div>

5、将 `client_id` 和 `client_secret` 值复制并粘贴到 Splunk 设置页面上的相应位置。

同时完成以下附加字段：

| 字段                                        | 值                                                                                                                                                                                          |
| ----------------------------------------- | ------------------------------------------------------------------------------------------------------------------------------------------------------------------------------------------ |
| Index                                     | 选择之前在指南中创建的索引：`bitwarden_events`。                                                                                                                                                          |
| Server URL                                | <p>对于自托管 Bitwarden 用户，请输入您的自托管 URL。请确保该 URL 在末尾不包含正斜杠 「<code>/</code>」。<br><br>对于云托管组织，请使用 URL <code><https://vault.bitwarden.com></code> 或 <code><https://vault.bitwarden.eu></code>。</p> |
| Start date (optional)                     | <p>设置数据监控的开始日期。如果未设置，默认日期将设置为 1 年。                                                                                                                                                         |
| <br>此为一次性配置，设置后<strong>无法</strong>更改。</p> |                                                                                                                                                                                            |

{% hint style="info" %}
您的组织 API 密钥信息是敏感数据。不要在不安全的位置分享这些值。
{% endhint %}

6、完成后，选择 **Submit**。

## 了解搜索宏 <a href="#understanding-search-macro" id="understanding-search-macro"></a>

`bitwarden_event_logs_index` 搜索宏将在初始 Bitwarden 事件日志安装后创建。要访问宏并调整设置：

1. 打开顶部导航栏上的 **Settings**，然后，选择 **Advanced Search**。
2. 选择 **Search Macros** 以打开搜索宏列表。

### 搜索宏权限 <a href="#search-macro-permissions" id="search-macro-permissions"></a>

接下来，设置哪些用户角色有权使用宏：

1、通过选择 **Settings** → **Advanced Search** → **Search macros** 来查看宏。

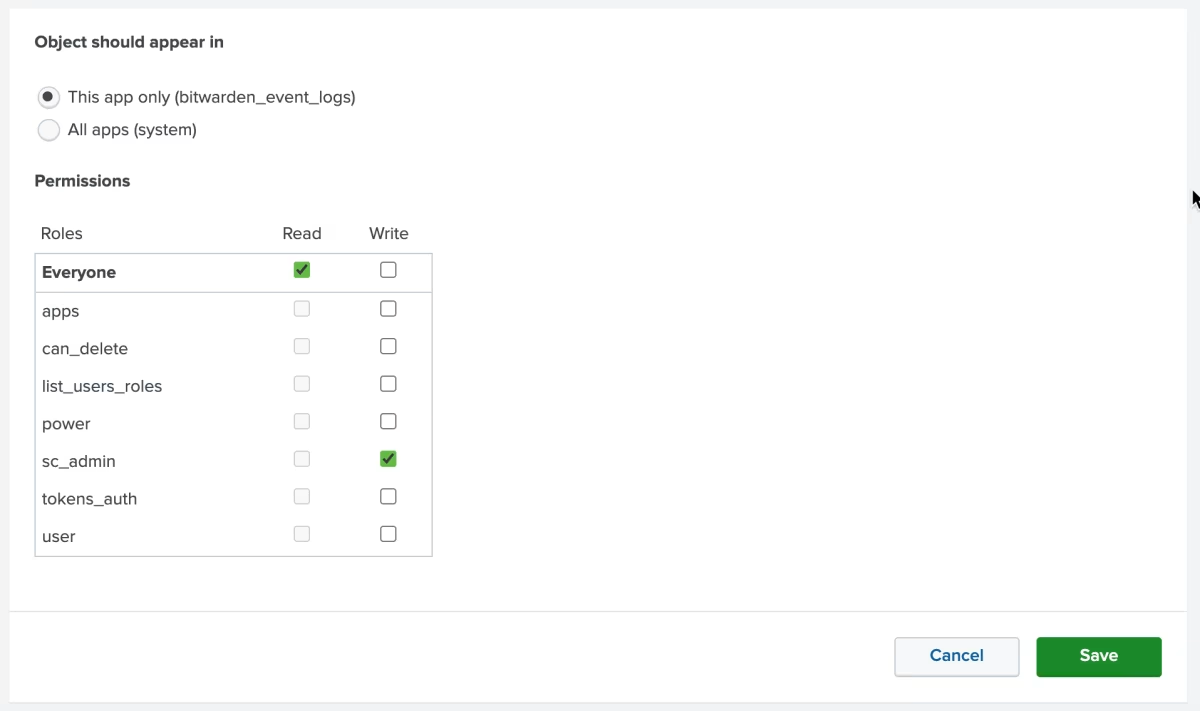
2、选择 `bitwarden_events_logs_index` 的**权限**。编辑以下权限，完成后选择**保存**：

<div align="left" data-with-frame="true"><figure><img src="https://bitwarden.com/assets/69xCHcmqFE8CLp7kGJJkdJ/4faffad91633090dd5709b32e4cb7bc0/2024-05-14_08-44-55.png?w=1200&#x26;fm=avif" alt=""><figcaption><p>搜索宏权限</p></figcaption></figure></div>

| 字段                      | 描述                                                              |
| ----------------------- | --------------------------------------------------------------- |
| Object should appear in | 要在事件搜索中使用宏，请选择 **This app only**。如果选择了 **Keep private**，宏将不会应用。 |
| Permissions             | 为具有**读取**和**写入**访问权限的用户角色选择所需的权限。                               |

{% hint style="info" %}
在给定时间，只有一个搜索宏可以在 App 上运行。
{% endhint %}

## 了解仪表板 <a href="#understanding-the-dashboards" id="understanding-the-dashboards"></a>

仪表板将提供多个用于监控和可视化 Bitwarden 组织数据的选项。数据监控的三个主要类别包括：

* Bitwarden 身份验证事件
* Bitwarden 密码库项目事件
* Bitwarden 组织事件

仪表板上显示的数据将为各种搜索提供信息和可视化。可以通过选择仪表板顶部的 **Search** 选项卡来完成更复杂的查询。

{% hint style="info" %}
搜索结果只会显示与特定事件类型相关的数据。不属于特定事件类型范围的属性在搜索结果中将显示为 `null`。例如，当事件类型为用户登录时，将显示为 `collectionId=null`。
{% endhint %}

### 时间范围 <a href="#timeframe" id="timeframe"></a>

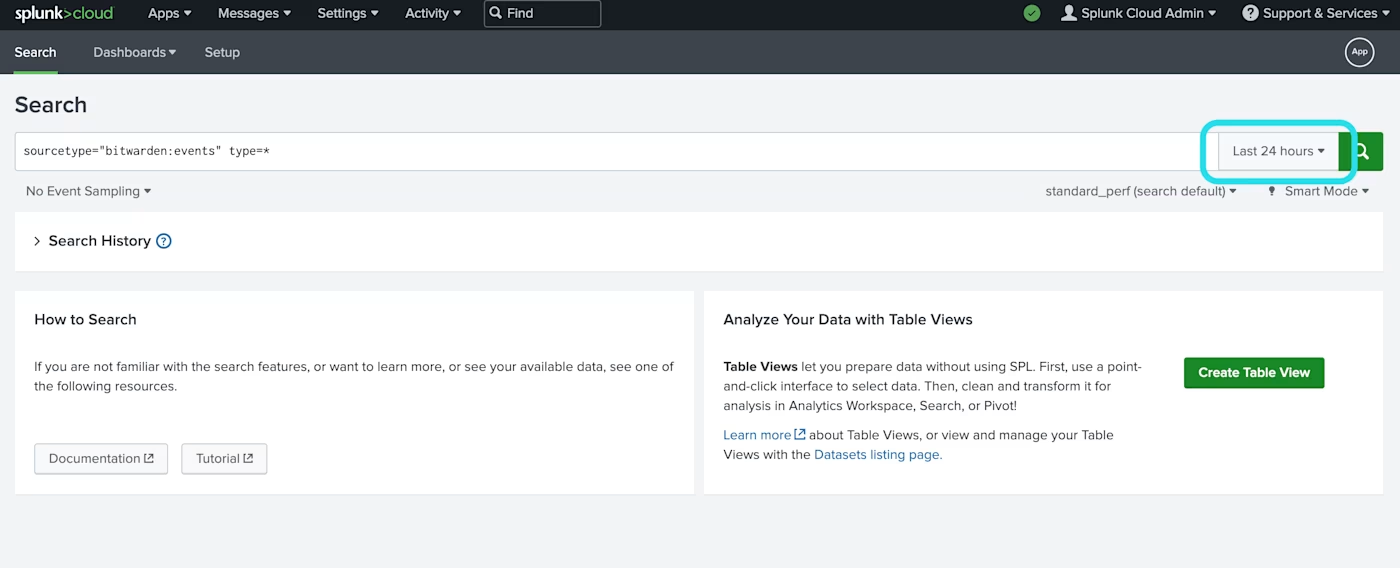
从 **Search** 页面或 **Dashboards** 进行搜索时，可以将搜索指定为特定的时间范围。

<div align="left" data-with-frame="true"><figure><img src="https://bitwarden.com/assets/zizTsxjCMKlD4TXLmi2UZ/86807e58f3de67b9b51c10924f594069/2024-03-06_16-56-03.png?w=1400&#x26;fm=avif" alt=""><figcaption><p>Splunk 时间范围搜索</p></figcaption></figure></div>

{% hint style="info" %}
对于本地托管用户，Bitwarden 事件日志搜索支持以下时间范围：

* Month to date（本月至今）
* Year to date（年初至今）
* Previous week（上周）
* Previous business week（上一工作周）
* Previous month（上个月）
* Previous year（去年）
* Last 30 days（最近 30 天）
* All time（所有时间）
  {% endhint %}

## 查询参数 <a href="#query-parameters" id="query-parameters"></a>

通过包含搜索查询来设置特定搜索。Spunk 利用其搜索处理语言 (SPL) 方式进行搜索。有关搜索的更多详细信息，请参阅 [Splunk 文档](https://docs.splunk.com/Documentation/Splunk/9.0.4/Search/GetstartedwithSearch)。

**搜索的结构**：

```
search | commands1 arguments1 | commands2 arguments2 | ...
```

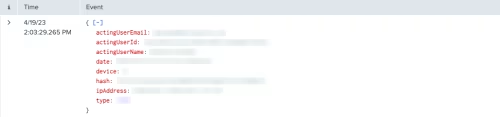
标准搜索结果对象的示例：

<div align="left" data-with-frame="true"><figure><img src="https://bitwarden.com/assets/620J7a17eXWhkgkCOzpixU/a75acef6074ca30a014811363cb36c8a/query_data.png?w=500&#x26;fm=avif" alt=""><figcaption><p>Spunk 搜索结果对象</p></figcaption></figure></div>

标准搜索对象中显示的字段可以包含在任何特定搜索中。这包括以下所有值：

### Bitwarden 字段 <a href="#bitwarden-fields" id="bitwarden-fields"></a>

| 值                 | 示例结果                                                                                                                                      |
| ----------------- | ----------------------------------------------------------------------------------------------------------------------------------------- |
| `actingUserEmail` | 执行操作的用户的电子邮件。                                                                                                                             |
| `actingUserId`    | 执行操作的用户的唯一 ID。                                                                                                                            |
| `actingUserName`  | 执行操作的用户的名称。                                                                                                                               |
| `collectionId`    | 组织集合 ID。                                                                                                                                  |
| `device`          | 用于标识执行操作的设备的数字。                                                                                                                           |
| `deviceName`      | 设备的数字 ID。具体映射关系请参阅[此处](https://github.com/bitwarden/splunk/blob/a9a6d6501c36d37ee7e95f88400c39f6ff2c926b/package/default/props.conf#L83)。 |
| `groupId`         | 组织群组 ID。                                                                                                                                  |
| `groupName`       | 组织群组名称。                                                                                                                                   |
| `hash`            | Splunk 计算的数据哈希。在[此处](https://docs.splunk.com/Documentation/Splunk/9.0.4/Security/Dataintegritycontrol)了解更多有关 Splunk 数据完整性的信息。             |
| `ipAddress`       | 执行事件的 IP 地址。                                                                                                                              |
| `itemId`          | 组织密码库的密码库项目（密码、安全笔记注释等）。                                                                                                                  |
| `memberEmail`     | 操作针对的组织成员的电子邮件。                                                                                                                           |
| `memberId`        | 操作针对的组织成员的唯一 ID。                                                                                                                          |
| `memberName`      | 操作针对的组织成员的名称。                                                                                                                             |
| `policyId`        | 组织策略更新。在[此处](/docs/admin-console/oversight-visibility/event-logging/event-logs.md#organization-events)了解组织事件。                             |
| `type`            | 表示发生的组织事件的事件类型代码。在[此处](/docs/admin-console/oversight-visibility/event-logging/event-logs.md)查看完整的事件代码列表和说明。                               |
| `typeName`        | 类型的数字 ID。在[此处](https://github.com/bitwarden/splunk/blob/a9a6d6501c36d37ee7e95f88400c39f6ff2c926b/package/default/props.conf#L8)了解映射关系。    |

### Spunk 默认字段 <a href="#spunk-default-fields" id="spunk-default-fields"></a>

以下 Splunk 默认字段将出现在查询中。有关 Splunk 默认字段的更多信息，请参阅 [Splunk 文档](https://docs.splunk.com/Documentation/Splunk/9.4.1/Knowledge/Usedefaultfields)。

字段：

* `source`
* `sourcetype`
* `date`
  * `date_hour`\
    `date_mday`\
    `date_minute`\
    `date_month`\
    `date_second`\
    `date_wday`\
    `date_year`\
    `date_zone`
* `index`
* `linecount`
* `punct`
* `splunk_server`
* `timestamp`

{% hint style="info" %}
与事件类型无关的属性将报告为 `null`。
{% endhint %}

**搜索全部**：

```shellscript
sourcetype="bitwarden:events" type=*
```

**按特定字段筛选结果**：

在以下示例中，搜索正在查找带有 `*` 通配符的 `actingUserName`，这将显示所有带有 `actingUserName` 的结果。

```shellscript
sourcetype="bitwarden:events" actingUserName=*Text 
```

**AND 运算符**隐含在 Splunk 搜索中。以下查询将搜索包含 `type` 类型和 `actingUserName` 的结果。

```shellscript
sourcetype="bitwarden:events" type=1000 actingUserName="John Doe"
```

通过使用 `|` 分隔符来包含多个命令。以下将显示最高值为 `ipAddress` 的结果。

```shellscript
sourcetype="bitwarden:events" type=1115 actingUserName="John Doe" | top ipAddress
```

## 附加资源 <a href="#additional-resources" id="additional-resources"></a>

### 设置用户角色 <a href="#set-user-roles" id="set-user-roles"></a>

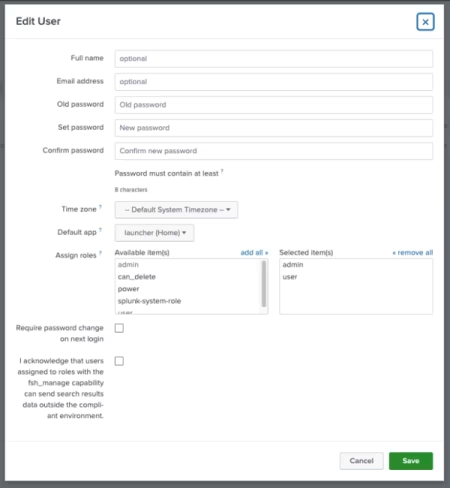
管理用户角色以允许个人执行特定任务。要编辑用户角色：

1、打开顶部导航栏上的 **Settings** 菜单。

2、从菜单右下角选择 **Users**。

3、在用户界面，找到您要为其编辑权限的用户并选择 **Edit**。

<div align="left" data-with-frame="true"><figure><img src="https://bitwarden.com/assets/5CnTzwphqVenaRu638uVoI/151e295ab1e06fad53698b648accf500/Screenshot_2023-04-13_at_9.48.48_AM__2_.png?w=450&#x26;fm=avif" alt=""><figcaption><p>Splunk 编辑用户权限</p></figcaption></figure></div>

在此界面，可以填写用户的详细信息。`admin`、`power` 以及 `can_delete` 等权限也可以在此处单独分配。

### 删除数据 <a href="#delete-data" id="delete-data"></a>

通过使用 SSH 访问清除索引来删除 Bitwarden 搜索数据。在某些情况下，例如更改被监控的组织，可能需要清除数据。

1、访问 Splunk 目录，然后 `stop` Splunk 进程。

2、使用 `-index` 标志清除 `bitwarden_events` 索引。例如：

```shellscript
splunk clean eventdata -index bitwaren_events
```

3、重新启动 Splunk 进程。

## 故障排除 <a href="#troubleshooting" id="troubleshooting"></a>

* 对于 Splunk Enterprise 用户，App 将记录到：`/opt/splunk/var/log/splunk/bitwarden_event_logs.log`

如果您遇到任何错误，或者 Bitwarden App 无法正常运行，用户可以检查该日志文件中的错误或参阅 [Spunk 文档](https://docs.splunk.com/Documentation/Splunk/9.2.0/Indexer/RemovedatafromSplunk)。


---

# Agent Instructions: Querying This Documentation

If you need additional information that is not directly available in this page, you can query the documentation dynamically by asking a question.

Perform an HTTP GET request on the current page URL with the `ask` query parameter:

```
GET https://help.ppgg.in/docs/admin-console/oversight-visibility/siem-integrations/splunk-siem.md?ask=<question>
```

The question should be specific, self-contained, and written in natural language.
The response will contain a direct answer to the question and relevant excerpts and sources from the documentation.

Use this mechanism when the answer is not explicitly present in the current page, you need clarification or additional context, or you want to retrieve related documentation sections.